
1 odd part ’bout the Yellow Switch is that, ’cept for the 1st level, it’s much easier to get than the Red Switch, e’en though my “canonical” sequence ( & as I mentioned in the intro, once a mandatory sequence till I came to my senses ) had the Red Switch before the Yellow Switch ( hence why I do so here ).
Adding this to the fact that the Yellow Switch opens access to mushroom-producing Yellow Switch blocks makes me recommend doing the Yellow Switch before the Red Switch for beginners ( well, other than recommending not playing this dreck @ all ).
World C: Shroom City Mainland ( revisited )
We still won’t be here for too long…
Highway to Hell ( 1st trip )
Music: “Dark Cave”, Pokémon Gold, Silver, & Crystal
This name isn’t an exaggeration: this level is a pain in the ass — & I only did the 1st exit.
I’m not sure whether to think the 1st pipe structure is clever or stupid: as the video shows, it leads you into thinking it’ll be some convoluted maze, only for most o’ its contents to be useless & that you’re actually s’posed to just go o’er it. E’en better — spoilers — 1 half o’ the secret exit actually is hidden in there, which only pulls the rug back under your feet after pulling it.
On the other hand, the path ’bove the pipe “maze” is just a boring straight path with a few Bob-Ombs you might get hurt by if you’re not paying attention out o’ pure impatience.
The part just after the midway point is quite dickish: it leads you to think you’re s’posed to use the springboard to get o’er the pipe wall, but as the video shows, you’ll want to use the convenient invisible blocks ’long the side. ’Less you’re good @ aiming your cape flight ( & you still have your cape ), you’ll need the springboard for later.
The 2nd hub doesn’t have much: mostly filler enemies round pipes that lead to different areas. There’s only 1 point o’ interest, but that’s for our next visit.
1 point o’ historical interest: I thought I remembered the 1st pipe leading back to the exit pipe in the 1st hub. I’m not sure if I took it out ’cause I thought ’twas useless & just an annoying beginner’s trap or if I’m just misremembering. Considering the bewildering ( & sad ) ’mount o’ stuff I do remember ’bout this dumb game, probably the former.
The next room you’re s’posed to go to is just a clusterfuck o’ enemies; but as I demonstrate when I finally beat it, you can clear out most o’ that cluster by kicking the shell o’ 1 o’ the Koopas @ the beginning. I actually kinda like it: it reminds me o’ an original Super Mario Bros. level.
’Course, as the video also shows, in order to get back o’er the wall in the 1st hub — back to that tantalizing floor o’ brown blocks covering the pipe, if you remember — you need a cape; so if you lost it, like I did, you have to go back into the 2nd hub & find a new 1 while keeping ’live & keeping the P-switch. If you die, you have to get both the P-switch & the cape all o’er ’gain.
I have mixed views on this level. It’s a pain in the ass; but you have to admit it’s a clever use o’ tools. It’s just way too early in the game. This is the kind o’ deviousness that should be reserved for a latter area — possibly as a bonus. Worst, it’s a huge bottleneck for the game. All the switches but the Red Switch require you to beat this level, 2 the normal exit, 1 the secret exit. That’s what makes the level particularly assholish.
Other than that, the 1 problem is that some areas, like the toxic water areas & the Piranha Plant area ( which we don’t see yet ) are fillerish: mostly many tiny jumps o’er death pits.
- P-Switch level count: 10 / 15
- Levels with mo’ than 1 switch: 3
- Levels with mo’ than 1 o’ the same switch: 3
Piranha Trap Pass ( 1st trip )
Music: “Overworld”, New Super Mario Bros.
Interestingly ’nough, “Highway to Hell” & “Piranha Trap Pass” are the 2 main gatekeepers to the rest o’ the game. “Highway to Hell” guards all but the Red Switch ’hind its normal & secret exits while “Piranha Trap Pass” guards the Yellow & Blue Switches ’hind “Highway”’s normal exit. Luckily, “Piranha Trap Pass” is much easier.
’Course, as the video shows, this level trolls the player a bit — as we’ll see I liked to do a lot. Tricking the player into Koopa hopping o’er Muncher pits when they’re truly s’posed to go left & bring a silver P-switch is ’specially silly considering the following levels will actually demand enemy-hopping o’er Muncher pits ( though there will still be mo’ trolling soon… )
As an extra trick, the level makes you think you can make going back past the reams o’ Piranha Plants easier by hitting the silver P-switch as soon as you reach it; but as the video shows, nope, you won’t make it, & you’ll be completely screwed out o’ getting the normal exit ’less you leave & come back.
I don’t know how many o’ these tricks were intentional. I know the last 1 I mentioned wasn’t, ’cause I literally was just trying it for the 1st time in that video footage.
Also, I like the palette on this 1. This was a later change & was probably when I started using Photoshop / GIMP filters to devise the colorsets for levels rather than just guessing colors like a buffoon.
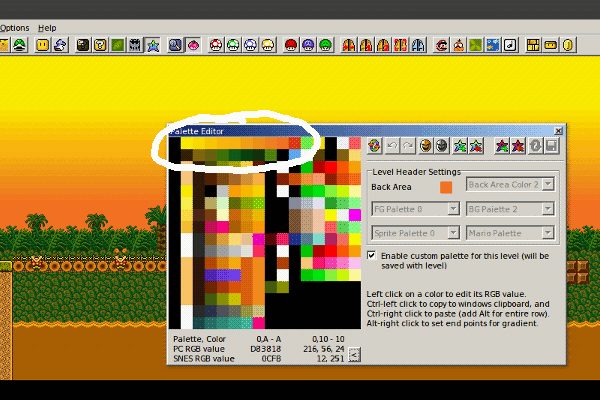
Speaking o’ which, I should talk ’bout the gradient backgrounds ( which gorgeously leave parts visible when the screen fades, a prevalent glitch that literally made SMW Central rightfully reject this hacky hack ): people @ SMW Central did praise me for my use o’ HDMI, some complicated SNES effect that I couldn’t figure out how to get working well in SMW. As that should hint, this doesn’t use HDMI @ all, but simply uses pixelated tinting & a gradient o’ shades ( which can easily be done in Lunar Magic’s palette editor by holding Alt & back clicking 2 colors @ either end o’ where you want to gradient to be ).
I simply created tiles o’ flat colors & a blend ’tween 2 side-by-side colors & put 1 ’bove the other for the illusion o’ smooth color transition ( actually, in my defense, since HDMI does not use pixelated transitions, but just flat bars, my version actually is smoother, which probably ’splains why people found my “version” looked so nice ). Hawk-eyed viewers will notice that in these backgrounds the gradient always starts ’bove the picture ( the jungle plants in this case ), while the part actually ’hind the picture is flat. That’s why: it’s part o’ the same background, & since the gradient takes up too many colors to share a row with the picture ( a tile can only use 1 palette row ), the gradient & the picture can’t share tiles; & since the gradient goes clear ’cross horizontally, they can’t share any vertical space.
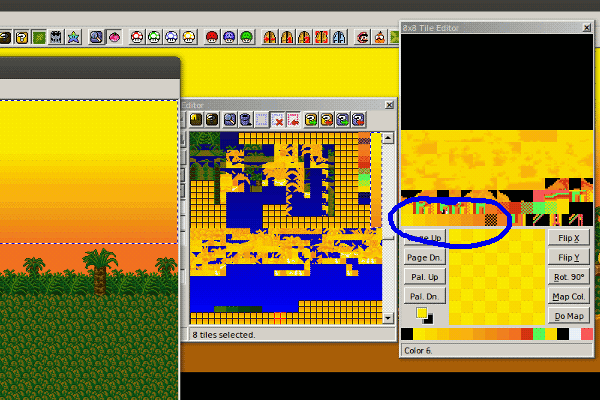
Note: the solid tiles aren’t pictured, ’cause they’re just the solid tiles that already exist in 1 o’ the 1st graphics “banks” that comes with the original Super Mario World to save space.
The lack o’ HDMI also ’splains why the gradients ne’er blend with the rest o’ the graphics, as real HDMI can do — & which makes HDMI worth it in the 1st place. Nor could I do any wavy effects. Compare my levels to this level from Brutal Mario, which actually uses HDMI, & one can see the clear difference:
- P-Switch level count: 11 / 16
- Levels with mo’ than 1 switch: 3
- Levels with mo’ than 1 o’ the same switch: 3
World E: Deserted Skies
Music: “Map Medley”, Super Mario World 2: Yoshi’s Island
You’ll get the “skies” part later.
Dusty Desert
Music: “Area 8 – Raddish Ruins”, Kirby & the Amazing Mirror
After 2 clever levels, we get utter mediocrity. The only interesting thing ’bout this level is that it has actual Koopa-hopping o’er Muncher pits — albeit, small, simple bouts — in contrast to the previous level.
But most o’ the level are hashed-together small jumps o’er spiked enemies or holes. Mo’ bewildering, despite being a desert, most o’ this level takes place in the clouds ( in fact, as we’ll see, all o’ these desert levels take place high up in the sky for some reason; if I had intentionally made this a sky/desert combo theme, I’d think this was clever ), which are just a ’scuse for tiny jumps. It’s copypasta level design to its max. It sucks.
- P-Switch level count: 12 / 17
- Levels with mo’ than 1 switch: 3
- Levels with mo’ than 1 o’ the same switch: 3
Death Valley
Music: “Area 8 – Raddish Ruins”, Kirby & the Amazing Mirror
& here we get the big troll level. Yes, as the video shows, it makes a big deal ’bout how you’re s’posedly s’posed to Koopa-hop o’er the long Muncher pit ( which, as the video shows, is actually quite easy if you bring a Yoshi ), only to provide 2 cape feathers that can be used to fly o’er it all, making this the easiest… Nope: e’en that’s not true. That’s ’nother troll level.
This was meant to be a satire on a common complaint ’bout Super Mario World & the cape feather & how people can just fly o’er some levels. The idea is that people have been so conditioned that flying o’er levels in Super Mario World & its hacks is wrong, is cheating, that it’s a puzzle to run into an actual level that requires it. & yet, it makes sense: the infinite flight isn’t some glitchy exploit, but an intentionally-designed game tool put in not just this hack, but the original. It makes sense that you’re s’posed to use it to beat some levels.
( Interestingly, ’nother theme I just now noticed in Desert / Sky World: the Yellow Switch, as I mentioned in the Red Switch, heavily focuses on flight to beat it — ’cept it’s actually challenging. So in addition to a troll, you could consider this level a stealth tutorial ).
- P-Switch level count: 12 / 18
- Levels with mo’ than 1 switch: 3
- Levels with mo’ than 1 o’ the same switch: 3
Dark Desert
Music: “Area 8 – Raddish Ruins”, Kirby & the Amazing Mirror
The 1 thing I can say ’bout this level is, man did I make it much mo’ concise. I remember the original version had the 1st part go on far longer, which meant that the swim under the 1st part took super long, which was ’specially tedious on the way there, constantly tapping the B button. There’s still a Cheep Cheep that jumps through dirt, but I guess you could make up some ’scuse for that. It’s better than an earlier version where there was a Blurp that outright swam through the sand.
Actually, in general I’d say this level makes good use o’ space, with the only exception being that random bowl-area with a single Pokey inside.
Granted, I’m not so fond o’ the reuse o’ the “hit P-switch to re-enter 1st area so you can rush to reach the pipe @ the start” for the secret exit, which had already been done much better in “Basidio Bridge”.
I’m also mixed on mixing the “enter pipe you entered from to enter a subtly different version o’ this room” for the water room keyhole with a separate secret for the key. On 1 side o’ it, having just, “Just enter 1 o’ the pipes you enter from” as the sole “secret” seems lame; on the other, this feels like a waste o’ ideas. I think I’d lean toward keeping it as it is.
You know, I used to remember thinking this level was worse than it seems now. I actually think this is quite a good level.
- P-Switch level count: 13 / 19
- Levels with mo’ than 1 switch: 4
- Levels with mo’ than 1 o’ the same switch: 3
Shroom of Sands
Music: “Area 8 – Raddish Ruins”, Kirby & the Amazing Mirror
I’m not sure why I bothered to e’en mention this, since it’s the exact same thing as the last 1 we saw — & the 5 or 6 we’ll see hereafter.
1 difference is that the message is e’en mo’ useless than the previous, which actually gave useful, albeit well-known, advice, while this just spews out a shitty joke that was already made in “Flaming Femurs”.
O well. I’d much rather go through the secret exit o’ “Dark Desert” than “Volcanic Valley”, so it’s not nearly as much a disappointment.
Pain in My Temple
Music: “Temple”, Zelda II: The Adventures of Link
The original version o’ this level was “Temple of the Cat”, an incredibly lame pun off the band, “Temple of the Dog”, which most people probably wouldn’t get. Sadly, this change means that my attempt to twist this post into a Chris Cornell tribute, which wouldn’t be cynical @ all, is ruined.
Anyway, it’d be a terrible tribute, ’cause this level is poop. The only good thing ’bout it is its graphics & music, which, as the message box that gets its own room for no good reason says, were just stolen by some jerk1.
The main problem is that maneuvering through a lot o’ places is awkward. As the video shows, Koopa-hopping o’er the Spear-heads is awkward; & if you accidentally kill 1 with a fireball, you’re fucked ( fireballs truly suck compared to the cape in this game; they’re almost worse than just being big ). But the alternative is ladder-hopping, which is fine for the normal exit, but a pain to do if you’re carrying a P-switch & don’t want to accidentally drop it into a pit. The skeleton fish are hard to see in the sand.
& then there’s that bullshit secret, with is just move-throughable wall which can only be discerned by noticing a slight color difference. Move-throughable walls are the laziest secret in all gaming.
There’s also a lot o’ empty padding. In addition to the empty room with the hilarious 4th-wall-breaking message box there’s a split path that leads to the midway point & key. ’Cept 1 path has literally nothing while the other has tricky-to-dodge Thwomps only 2 blocks from the ceiling. ¿Why bother with the hard part when you can literally just skip it? I guess if you haven’t hit the switch, you have to take the dangerous part to get the midway point — but not the key; but if you’re willing to risk that, you might as well be willing to risk hitting the switch, which is easier, & getting both. It makes no sense.
The 1 thing I do like is the dynamic o’ having a simple & easy normal exit to the left ( which pulls a bit o’ a “Chocolate Island 3” on you & simply creates a path back to Dry Desert, as if you e’er wanted to play that awful level ’gain ) & a mo’ challenging secret exit to the right. Also, Wario Land 3 chest in night sky as keyhole is a nice touch.
As an extra note: I’m not the only one who noticed that this level is the best way to grind money ( which, as we’ll see, we’ll need later ).
- P-Switch level count: 14 / 20
- Levels with mo’ than 1 switch: 4
- Levels with mo’ than 1 o’ the same switch: 3
Lab of the Mirage
Music: “Revenge of Meta Knight – Halbert”, Kirby Super Star
¿“Mirage”? ¿What mirage? ¿Why wasn’t this called “Lab of Sands” to both be consistent with the “Shroom” & to take advantage o’ the fact that “sands” is both alliterative with “shroom” & rhymes with “lab”?
This lab probably fits the least with its theme; but it’s still a thousand times funner than “Lab of Darkness”, ¿so who cares? I guess one could make a connection ’tween this level’s focus on yellow blocks & sand… Not sure the 2nd part fits in, though. ¿’Cause the electric bolts are yellow? I guess everything’s slightly yellow.
It’s short, but that makes it sweeter than the giant mound o’ shit that’s “Lab of Darkness”. Sorry, there’s not much to say ’bout this level other than comparing it to the previous lab.
I can say that the boss is mo’ interesting than the “Lab of Darkness” boss. I’d say it’s the 2nd best. It’s not exactly brilliant; but when you don’t want to reuse Super Mario World’s e’en lamer bosses & can’t figure out how to use the Custom Boss sprite from SMW Central, you use what you have. ( I guess I could’ve used some other custom sprites — which I rarely used in this hack, for some reason. )
- P-Switch level count: 14 / 21
- Levels with mo’ than 1 switch: 4
- Levels with mo’ than 1 o’ the same switch: 3
The Yellow Switch
Music: “The Axem Rangers Drop In”, Super Mario RPG
& this Switch is much better than the Red Switch.
The only problem is that Yoshi, who should ne’er be ’loud to enter this level, ruins it.
I wish this level did mo’ with flying. Just dodge a few spike balls. As the video shows, e’en if you get hit by 1, it’s still quite easy to make it to the pipe.
- P-Switch level count: 14 / 22
- Levels with mo’ than 1 switch: 4
- Levels with mo’ than 1 o’ the same switch: 3
Only 3 posts & we’ve already been through half the Switches & mo’ than 1/3 the levels.

